Using Your Easy Grip Fermenter Lid Kit
Thank You! We appreciate your confidence in us.
This guide provides the basic steps on using our Lids to get the best and easiest ferments.
Easy Grip Fermenting Club Member Benefits

1 Year Product Warranty
Discounts
Updated Recipes
Promotional Discount Alerts
Contests
…and more
Remember to Register Your Easy Grip Fermentation Lids Kit For Club Member Benefits. For more detailed fermenting instructions and recipes, you can register at:
https://www.brillenti.com/Club
Making your own fermented Veggies is the best way to get massive amounts of probiotics into your gut. And a healthy gut is the pathway to a healthy immune system.
The Easy Grip Fermenting Process
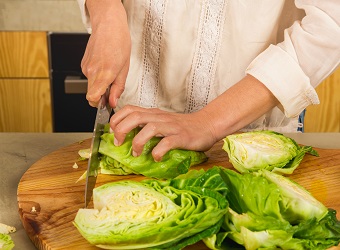
Step 1 – The Veggies
Select clean, fresh, non-starchy vegetables such as cabbage, beets or carrots. Organic is preferred. Chop and slice the vegetables into smaller pieces.
Pro Tip: Before chopping cabbage, peel off a few outer leaves to later place on top of the vegetables.
Step 2 – The Brine
At this stage, you can dry salt or use brine. Brining is recommended when new to fermenting. A good starting brine ratio is 1 or 2 tablespoons of natural Salt to 1 quart of Filtered Water.
Place the chopped vegetables into a ceramic or glass bowl and pour in the brine. Mix the vegetables thoroughly in the brine and allow the mixture to set for at least 15 minutes.
Celery juice can be used in place of the filtered water as it contains a lot of natural salt.
Pro Tip: For a Powerful Ferment- add a starter culture to the brine. Ideally begin with 1 teaspoon of starter culture per quart of brine. This will produce powerful fermented veggies. Just one or two tablespoons of these can provide probiotics equal to a handful or more of probiotic capsules.
Step 3 – The Jar
Spoon the vegetables into wide mouth mason jars. Pour in more brine, filling to no higher than 1-2” from the top of the jar.
Pro Tip: Do not fill jar to the top. Doing so could cause brine leakage out the top of the lid valve or draw brine up into the pump.
Step 4 – Keep the Veggies Submerged
It is important to keep the veggies submerged below the brine. Any vegetable above the brine will not ferment properly and could easily mold.
One way to accomplish this is to use one of the cabbage leaves you kept aside during step 1. Cover the top of the brine with the leaf and press it down until it is also submerged. You can tuck the edges down along the sides using a spoon. This is an ideal method.
Another method is to use Glass weights or Pie Weights in an organic cotton bag or similar clean organic material.
Step 5 – Twist the Lid onto the Jar
Pro Tip: Do not over-tighten. The gases produced from the lacto-fermentation process will help seal the Lid.
Pro Tip: Set the Date Indicator to the date you begin the ferment.
Step 6 – The Oxygen Extractor Pump
The Pump is not needed at the initial stages of the ferment, but it can be used even then if desired. During the initial few days of a ferment, a lot of carbon dioxide gases are produced by the fermentation process. They not only help seal the lid, but also force air and oxygen out of the jar through the center waterless airlock valve.
However, during the later stages of a ferment, not as much carbon dioxide is produced. If you open the jar during the ferment to taste test, then the pump should be used to remove the oxygen and re-seal the lid.
Pro Tip: There is no need to over use the pump. Only a couple pumps are needed.
Our lids are specially designed with a raised center valve to prevent brine from being sucked into the pump.
Step 7 – Fermenting Stage
Store the jar in a cupboard or on a counter between 70 – 80 degrees Fahrenheit. The ideal temperature for lacto-fermentation is 72 degrees Fahrenheit.
Step 8 – Removing the Lid
Pro Tip: Gently pushing the center valve to one side will release any air pressure from the jar and allow an easier removal of the Lid.
The 4 Easy Grip tabs were designed to help in case the lid is a little stubborn in releasing from the jar.
Step 9 – Move Jar to Refrigerator
After the ferment is done according to your taste and recipe, move the jar to the refrigerator. Fermenting times are usually between 3 to 30 days while 7 days is common for fermenting cabbage.
Pro Tip: There is no need to change lids when moving to the fridge. You can leave the Easy Grip Lid on the jar or replace it with a normal wide mouth jar lid.
Cleaning Your Lids
We strongly recommend hand washing your Easy Grip Lids. There is usually no need to remove the gasket or valve after each use. However, we encourage you to occasionally remove those as well for a thorough hand cleaning.
Thank you again for purchasing Easy Grip Lids. We know you will enjoy using them. The modern low profile design allows for easy jar storage and no burping of lids. We designed them to make fermenting more enjoyable for you.
Happy Fermenting!
Greg
Owner, Brillenti
support@brillenti.com
Contents of this guide are the property of Brillenti © Copyright 2018.
Read full post Here:
